Build Your Own Cloud Virtual Machine Lab with Virtua Lab
What is Build Your Own Cloud Virtual Machine Lab with Virtua Lab
Build Your Own Cloud Virtual Machine Lab with Virtua Lab is a hands-on way to try AI “virtual try-on” at home or in the cloud. It uses research from Virtu Lab and ByteDance to swap clothes on a person’s photo or video while keeping body shape and motion stable.
At its core, it takes a clothing image and a person image (or video) and produces a new picture or clip that looks natural. You can control the pose, pick from different AI backbones, and save results locally. To learn more about the background and ongoing notes, see our Virtu Lab notes.
Build Your Own Cloud Virtual Machine Lab with Virtua Lab Overview
Here’s a quick view of what this project offers.
| Item | Details |
|---|---|
| Type | Open-source AI try-on and garment-centric human generation |
| Purpose | Place a chosen garment on a person photo or video with strong detail and motion stability |
| Main Features | Anything-Dressing Encoder, pose control, FLUX and SD 1.5 support, prompt helper with large multi‑modal models, LoRA add‑ons |
| Inputs | Garment image, person image or video, optional pose image, short text prompt |
| Outputs | New person image or video wearing the target garment |
| Who It’s For | Creators, online shops, fashion teams, and hobbyists |
| Project Page | Visit Virtu Lab at https://virtu-lab.github.io/ |
| Code Base | DreamFit repo (ByteDance): https://github.com/bytedance/DreamFit |
Build Your Own Cloud Virtual Machine Lab with Virtua Lab Key Features
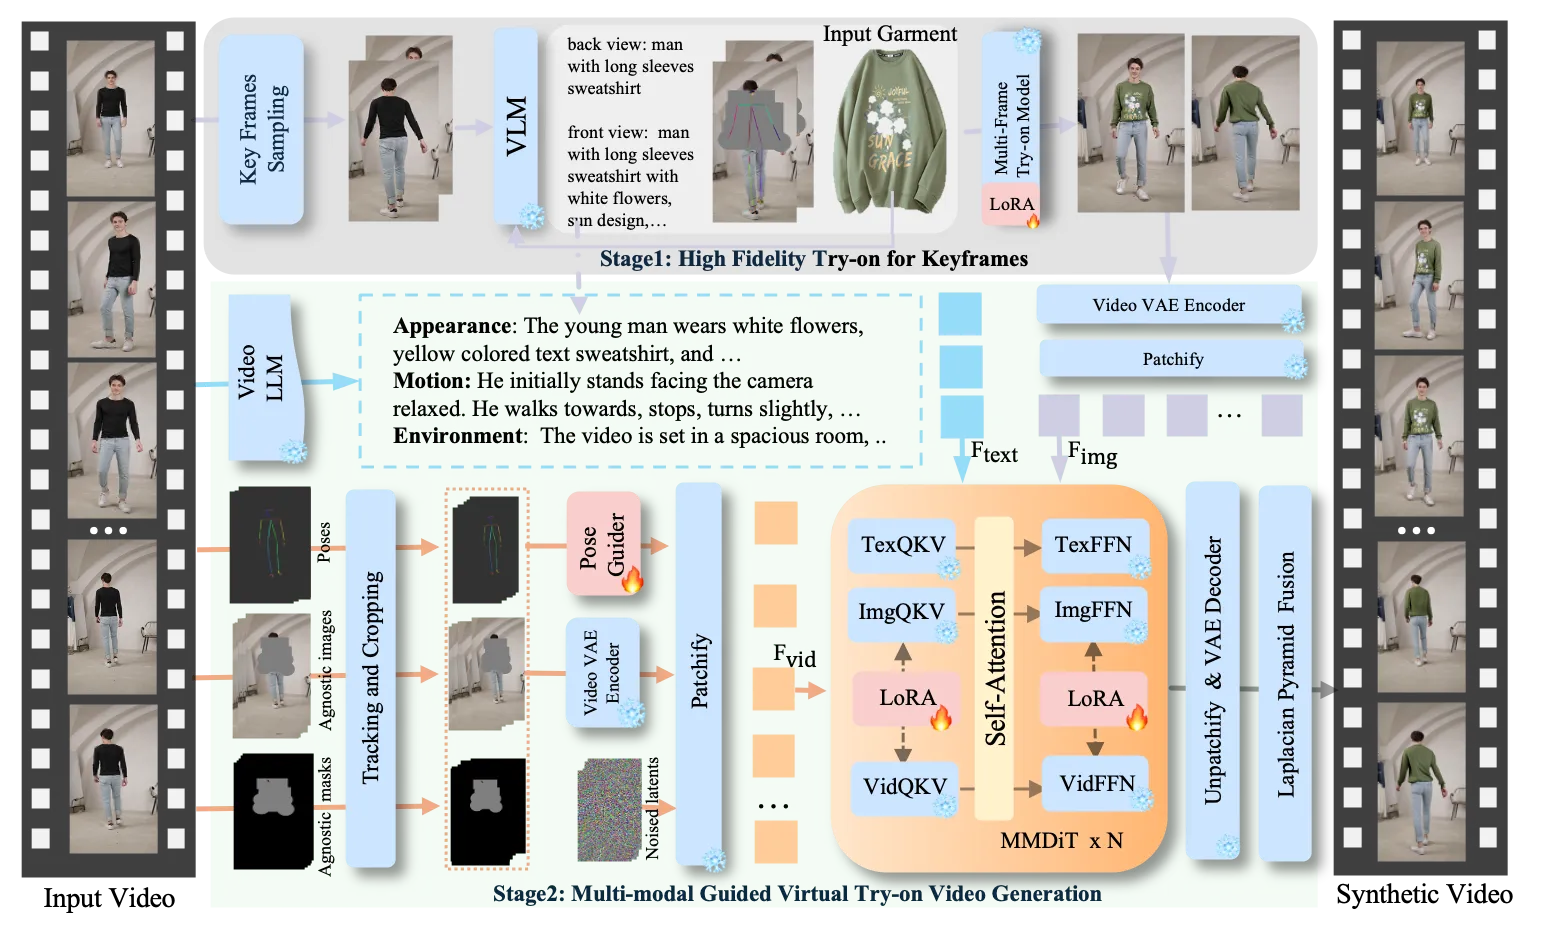
- Two-stage try-on flow for video: first, pick strong keyframes; second, generate the full clip with steady motion.
- Anything-Dressing Encoder: a light module that reads garment details and keeps textures consistent.
- Works with two popular backbones: FLUX and Stable Diffusion 1.5, plus style models like Realistic Vision.
- Pose control: match a target pose for the final image if you want.
- Prompt helper: adds clear garment words so results match your text better.
- Plug-and-play LoRA and control add-ons to keep the system light while still flexible.
For context on the company behind the research repo, see our ByteDance page.

Build Your Own Cloud Virtual Machine Lab with Virtua Lab Use Cases
- Online stores: show how a shirt looks on different models without a studio shoot.
- Fashion teams: test designs on many body types and styles before production.
- Creators: make posters, thumbnails, or short clips for social pages.
- Animation and fun: outfit characters in fresh looks for storyboards and mood boards.
How It Works (Plain English)
- Pick key frames: The system finds important frames from your input video. It creates strong, matching images for those frames using a multi-frame model and a vision-language helper.
- Add motion and details: It reads body pose and short motion notes from the input. Then it uses a video model with LoRA add‑ons to build the full clip that stays steady over time.
- For images only: You can also run a single image try-on or add pose control for the final pose you want.
Installation & Setup
Follow these steps exactly to build your own lab on a local PC or a cloud VM.
Clone the repository:
git clone https://github.com/bytedance/DreamFit.git
Create and activate a clean environment:
conda create -n dreamfit python==3.10
conda activate dreamfit
Install dependencies:
pip install -r requirements.txt
pip install flash-attn --no-build-isolation --use-pep517
Download pretrained models into the correct folders. The structure should look like this:
├── pretrained_models/
| ├── flux_i2i_with_pose.bin
│ ├── flux_i2i.bin
│ ├── flux_tryon.bin
│ ├── sd15_i2i.ckpt
| ├── stable-diffusion-v1-5/
| | ├── ...
| ├── sd-vae-ft-mse/
| | ├── diffusion_pytorch_model.bin
| | ├── ...
| ├── Realistic_Vision_V6.0_B1_noVAE(or other stylized model)/
| | ├── unet/
| | | ├── diffusion_pytorch_model.bin
| | | ├── ...
| | ├── ...
| ├── Annotators/
| | ├── body_pose_model.pth
| | ├── facenet.pth
| | ├── hand_pose_model.pth
| ├── FLUX.1-dev/
| | ├── flux1-dev.safetensors
| | ├── ae.safetensors
| | ├── tokenizer
| | ├── tokenizer_2
| | ├── text_encoder
| | ├── text_encoder_2
| | ├── ...
Notes:
- Use Stable Diffusion 1.5 files if you choose that path.
- For FLUX, place flux-dev files into pretrained_models/FLUX.1-dev/.
- For pose control, place Annotators into pretrained_models/Annotators/.
Getting Started: First Try-On in Your Lab
Here are working command lines you can run right away. Copy and paste them as they are.
Garment-Centric Generation:
# inference with FLUX version
bash run_inference_dreamfit_flux_i2i.sh \
 --cloth_path example/cloth/cloth_1.png \
 --image_text "A woman wearing a white Bape T-shirt with a colorful ape graphic and bold text." \
 --save_dir "." \
 --seed 164143088151

# inference with StableDiffusion1.5 version
bash run_inference_dreamfit_sd15_i2i.sh \
 --cloth_path example/cloth/cloth_3.jpg\
 --image_text "A woman with curly hair wears a pink t-shirt with a logo and white stripes on the sleeves, paired with white trousers, against a plain white background."\
 --ref_scale 1.0 \
 --base_model pretrained_models/Realistic_Vision_V6.0_B1_noVAE/unet/diffusion_pytorch_model.bin \
 --base_model_load_method diffusers \
 --save_dir "." \
 --seed 28
Tips:
- If you have multiple pieces of clothing, you can splice them onto one picture, as shown in the second row.
- Use --help to check the meaning of each argument.
Garment-Centric Generation with Pose Control:
bash run_inference_dreamfit_flux_i2i_with_pose.sh \
 --cloth_path example/cloth/cloth_1.png \
 --pose_path example/pose/pose_1.jpg \
 --image_text "A woman wearing a white Bape T-shirt with a colorful ape graphic and bold text." \
 --save_dir "." \
 --seed 16414308815
Try-on (person image + garment):
bash run_inference_dreamfit_flux_tryon.sh \
 --cloth_path example/cloth/cloth_1.png \
 --keep_image_path example/tryon/keep_image_4.png \
 --image_text "A woman wearing a white Bape T-shirt with a colorful ape graphic and bold text and a blue jeans." \
 --save_dir "." \
 --seed 16414308815
Tips:
- Keep image is obtained by drawing the openpose on the garment-agnostic region.
- The generation code for keep image cannot be open-sourced for the time being. As an alternative, we have provided several keep images for testing.
If you want extra reading on broad AI topics and tools, visit Omnihuman 1.Com.
Performance & Showcases
Showcase 1 — 1 This clip is part of “Try-on Show Time” and shows stable clothing details and clean edges. It gives a clear sense of how the shirt fits as the subject moves.
Showcase 2 — 1 Here, the outfit holds its texture during quick motion. It keeps the pattern and shape steady from frame to frame.
Showcase 3 — 1 This example focuses on color and logo clarity. The garment stays crisp while the person turns.
Showcase 4 — 1 Watch how the clothing follows body pose changes. The system keeps the look steady across the short clip.
Showcase 5 — 1 This sample shows try-on quality for casual wear. Note the letter shapes and seams that remain easy to see.
Showcase 6 — 1 In this final test, the model keeps details during wider steps and arm swings. Patterns remain readable across the whole video.
The Technology Behind It
- Anything-Dressing Encoder: reads garment features and feeds them into the denoising UNet through adaptive attention. This keeps textures and prints aligned.
- Prompt helper: large multi‑modal models add fine words to your prompt so the model knows the garment style better.
- Light add‑ons: LoRA keeps extra weights small, so you can run tests faster on regular GPUs or common cloud VMs.
Tips & Best Practices
- Start with FLUX for strong results; switch to SD 1.5 if you want a certain art style like Realistic Vision.
- Keep image size close to the examples first. Then try bigger sizes once it runs well.
- Seed control helps repeat a look. Keep the same seed to compare small changes.
FAQ
Do I need a GPU for this lab?
You can run some parts on CPU, but a GPU makes it much faster. A mid-range NVIDIA GPU with enough VRAM will help. Cloud GPUs also work well for quick trials.
Can I control the person’s pose?
Yes, you can add a pose image in the “with pose” script. The system reads that pose and matches it in the final output. Use the example pose files to start.
What models should I download first?
For FLUX, download flux-dev files. For SD 1.5, download stable-diffusion-v1-5 and the sd-vae-ft-mse files. Put them into pretrained_models as shown in the folder tree.
Can I try more than one garment at once?
Yes. If you have multiple pieces of clothing, you can splice them onto one picture. The system will read them together during generation.
Where do results get saved?
Use the --save_dir flag to set it. In the sample commands above, it saves to the current folder. Check your console output for exact paths.
Image source: Build Your Own Cloud Virtual Machine Lab with Virtua Lab