Next-Gen Face Swapping: Bridging the Image-to-Video Gap with DreamID-V
What is Next-Gen Face Swapping: Bridging the Image-to-Video Gap with DreamID-V
DreamID-V is a research project that swaps a face from a single image into a full video, while keeping the person’s key traits across every frame. It is built by Tsinghua University and the Intelligent Creation Team at ByteDance, using a Diffusion Transformer backbone to handle motion, pose, and detail in video.
It is made for creators, studios, and teams who need strong identity match without hand-tuning each frame. You provide a cropped face photo and a target video, and the system produces a new video with the face swapped in.
Next-Gen Face Swapping: Bridging the Image-to-Video Gap with DreamID-V Overview
Here is a quick snapshot of what this project offers and how it works.
| Item | Detail |
|---|---|
| Type | Open-source image-to-video face swapping model |
| Goal | Bring a single face photo into a target video with strong identity match |
| Teams | Tsinghua University; Intelligent Creation Team, ByteDance |
| Core Variants | DreamID-V-Wan-1.3B-Faster; DreamID-V-Wan-1.3B-DWPose; DreamID-V-Wan-1.3B-MediaPipe |
| Inputs | Cropped face image (recommended 512x512), target video |
| Output | Video (best results at 1280x720) |
| Speed | “Faster” version: 1x boost and lower VRAM use |
| Pose Backends | DWPose or MediaPipe (pick what fits your setup) |
| Scaling | Single-GPU and Multi-GPU (FSDP + xDiT) |
| Best For | Ads, promos, dubbing, social content, short films, pre- work |
| Project Page | Project page link on the DreamID-V site (opens in a new tab) |
Want background on the image-only version? See our short take here: DreamID (image version) overview.
Next-Gen Face Swapping: Bridging the Image-to-Video Gap with DreamID-V Key Features
- High identity match from a single face photo across full video motion.
- Three model variants to match your needs: Faster (speed/VRAM), DWPose (strong pose stability), and MediaPipe (simple setup).
- Runs on a single GPU or across multiple GPUs with FSDP and xDiT for bigger batches or higher resolution.
- Practical tips are built in: crop the face to 512x512, try 20 sampling steps for faster runs, and aim for 1280x720 for best look.
- Ongoing updates: Faster model (1.3B) with speed boost, and DWPose upgrade for better pose consistency.
Next-Gen Face Swapping: Bridging the Image-to-Video Gap with DreamID-V Use Cases
- Video ads and promos: swap a brand face into ready footage fast.
- Dubbing and localization: match a new face with the same timing and head motion.
- Social clips and creator workflows: reface for series content with steady quality.
- Film and pre-production: test casting picks in scene drafts.
- Privacy-safe avatars: use a stand-in face while keeping movement and timing.
Want to build your base clip from text first? See our guide to prompt-based video: text-to-video basics.
Performance & Showcases (Mandatory if demo videos or examples are available)
Showcase 1 — Heading: Demo | Label: Demo Video This entry shows a quick sample run of the model in action. It focuses on swapping a face into a moving clip with stable identity.
Showcase 2 — Heading: Bridging the Image-to-Video Gap for High-Fidelity Face Swapping via Diffusion Transformer | Label: Demo Video This demo highlights how the method carries a single face photo through motion with fine detail. The title text, Heading: Bridging the Image-to-Video Gap for High-Fidelity Face Swapping via Diffusion Transformer | Label: Demo Video, reflects the core goal.
Showcase 3 — Heading: Bridging the Image-to-Video Gap for High-Fidelity Face Swapping via Diffusion Transformer | Label: Loading... ☕ This slot is marked as loading on the project page, with the text Heading: Bridging the Image-to-Video Gap for High-Fidelity Face Swapping via Diffusion Transformer | Label: Loading... ☕. Check back later for the final clip.
Showcase 4 — Heading: Bridging the Image-to-Video Gap for High-Fidelity Face Swapping via Diffusion Transformer | Label: Loading... ☕ This entry is also flagged as loading on the page, showing Heading: Bridging the Image-to-Video Gap for High-Fidelity Face Swapping via Diffusion Transformer | Label: Loading... ☕. A finished video is expected soon.
Showcase 5 — Heading: Bridging the Image-to-Video Gap for High-Fidelity Face Swapping via Diffusion Transformer | Label: Loading... ☕ Again, the page notes a loading state: Heading: Bridging the Image-to-Video Gap for High-Fidelity Face Swapping via Diffusion Transformer | Label: Loading... ☕. Stay tuned for the final media.
Showcase 6 — Heading: Bridging the Image-to-Video Gap for High-Fidelity Face Swapping via Diffusion Transformer | Label: Loading... ☕ This final slot carries the same loading note: Heading: Bridging the Image-to-Video Gap for High-Fidelity Face Swapping via Diffusion Transformer | Label: Loading... ☕. More samples should arrive over time.
How Next-Gen Face Swapping: Bridging the Image-to-Video Gap with DreamID-V Works
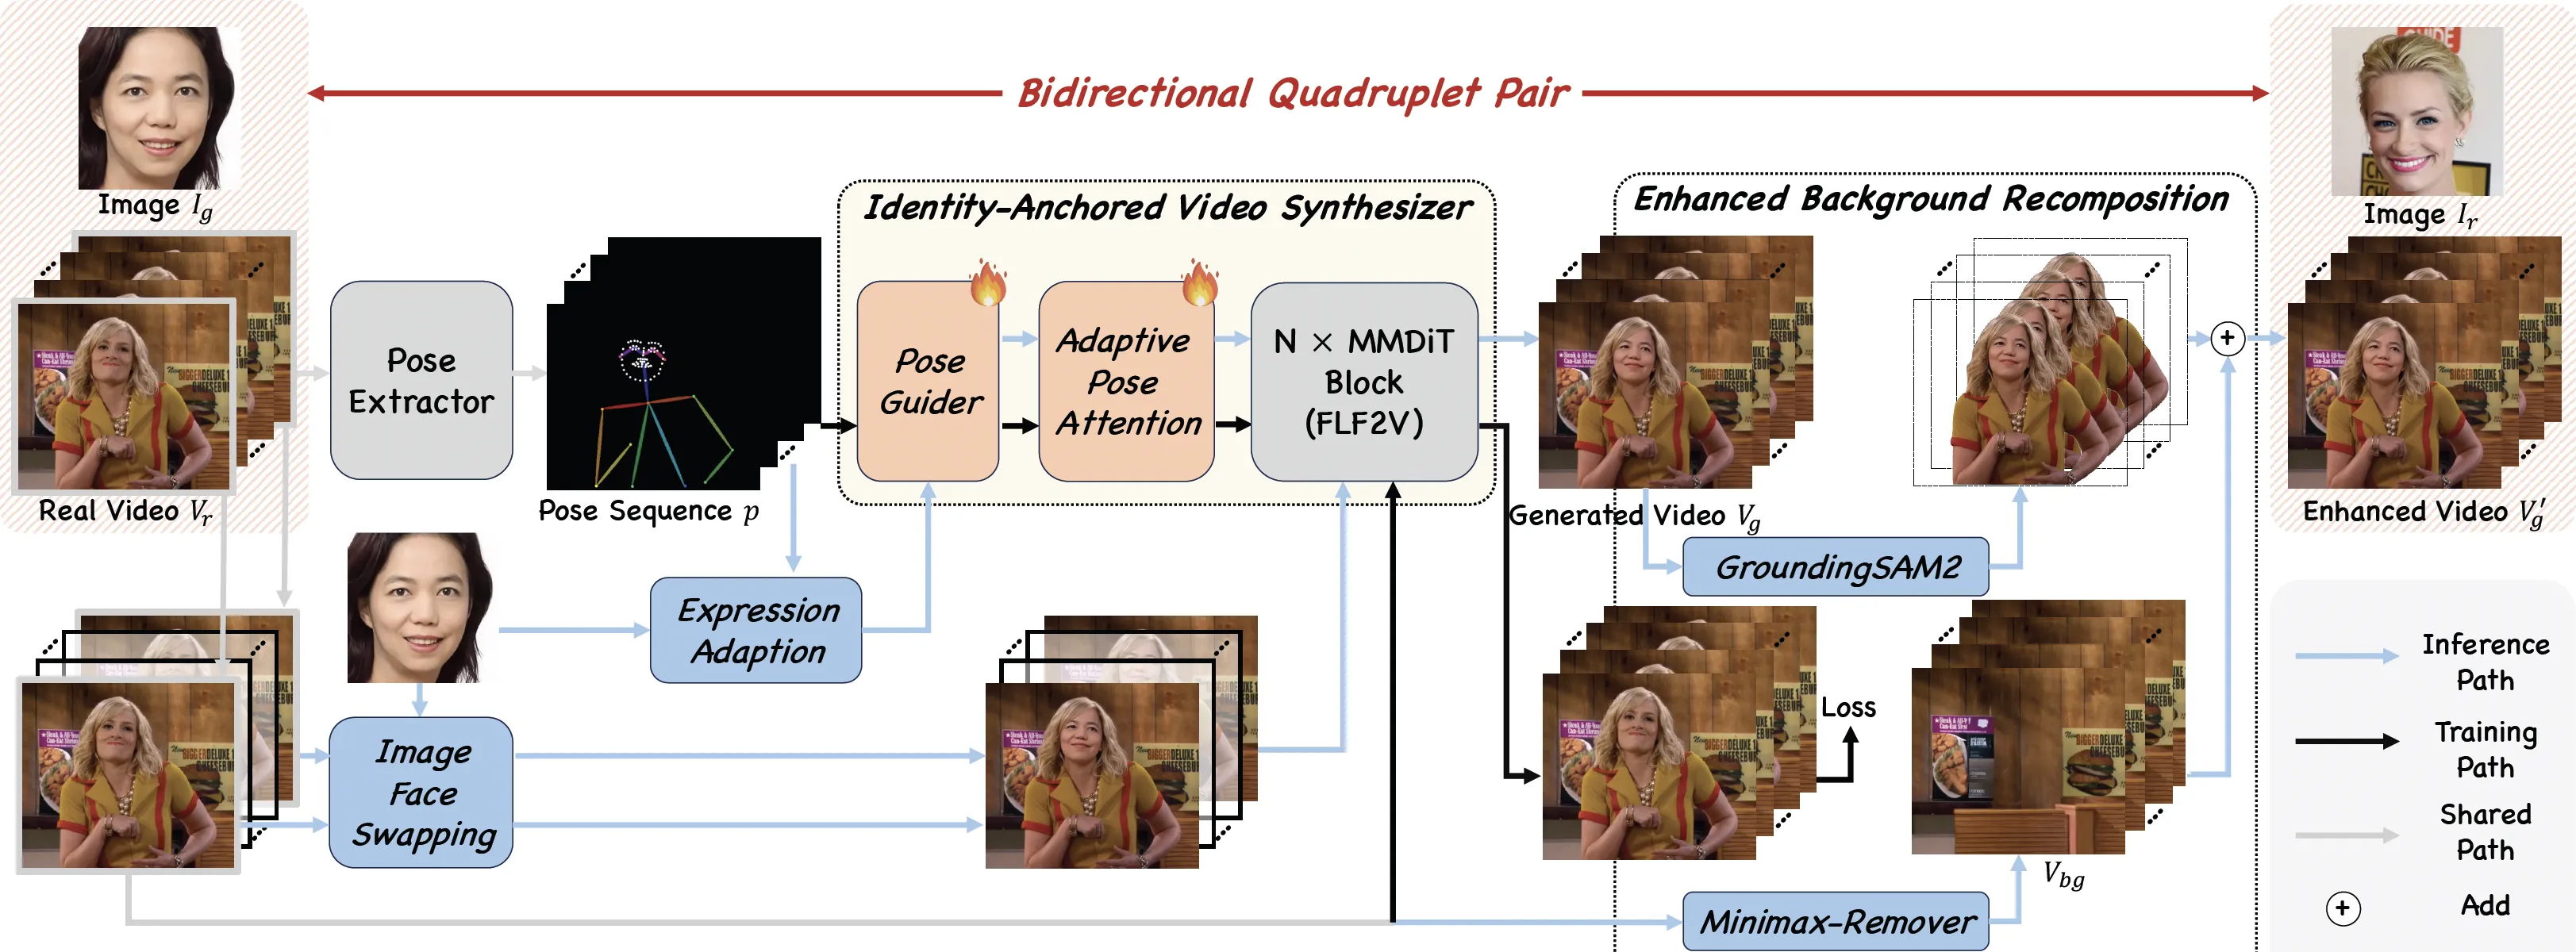
The team pre-trains an “Identity-Anchored Video Synthesizer” and pairs it with the DreamID image face swap model. This pairing creates a special training set called a “Bidirectional Quadruplet Pair,” which lets the model learn both ways: image to video, and video to image.
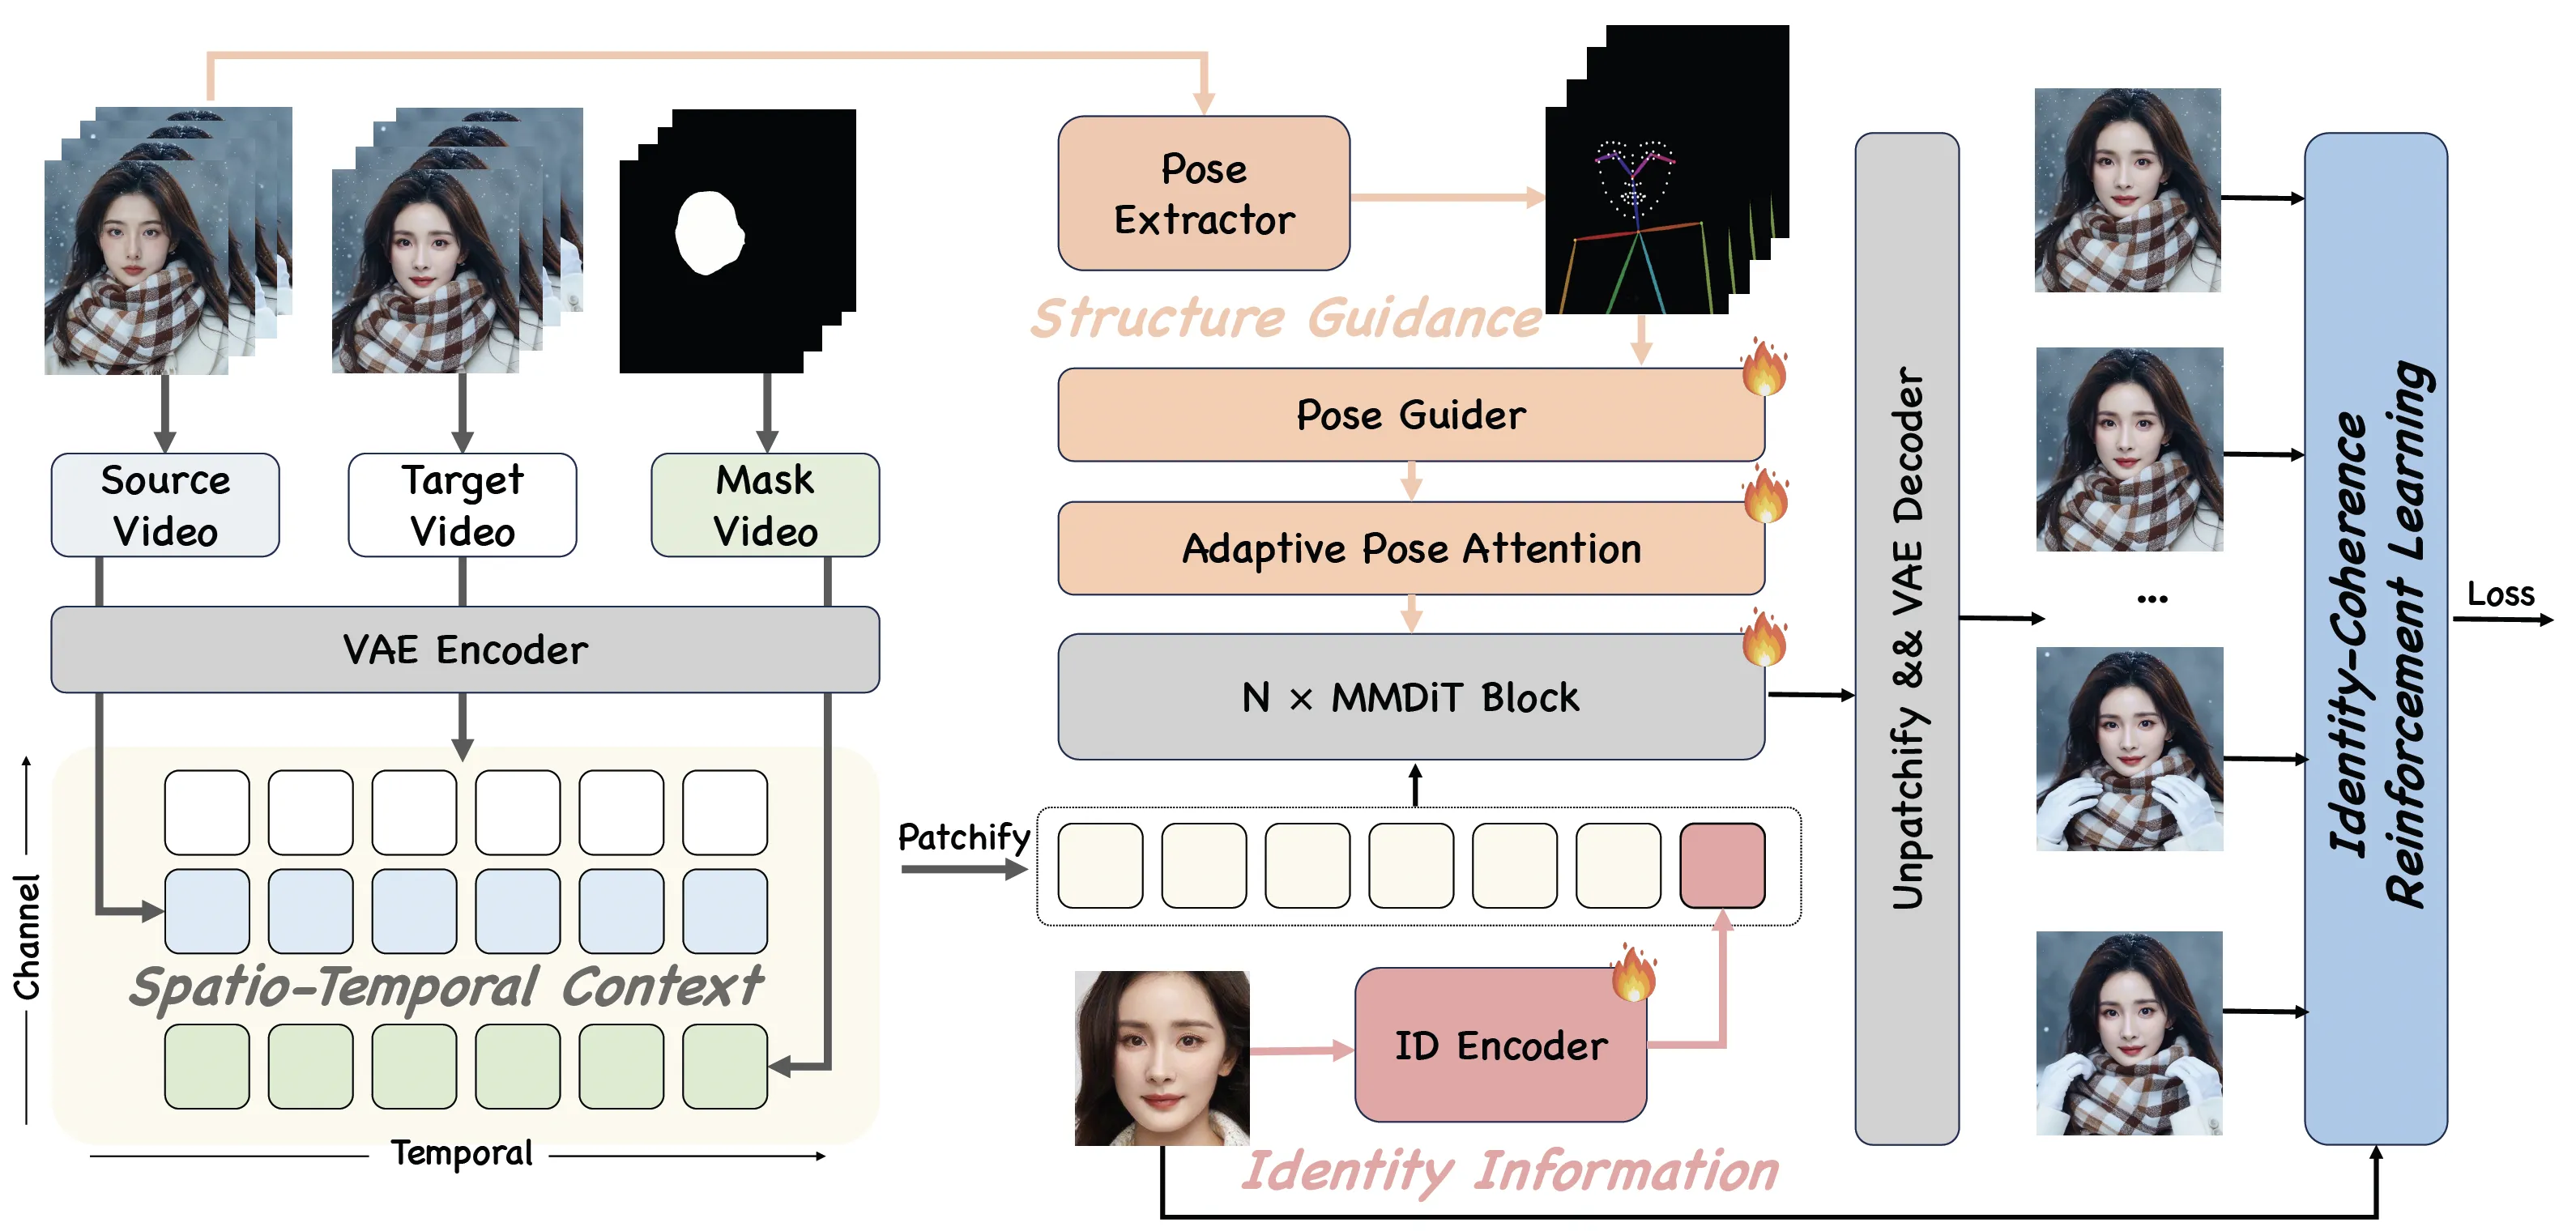
They add three kinds of guidance during generation: spatio-temporal context (to track motion over time), structure guidance (to keep face shape and layout), and identity information (to keep who the person is). To make full use of the training data, they train in three steps: synthetic training, real augmentation training, and identity-coherence reinforcement learning.
The Technology Behind It
DreamID-V is built on a Diffusion Transformer, a model class that is well-suited for video frames and motion. It uses pose detectors to read body and head pose from the target video so the face can follow the same movement.
You can pick DWPose for stronger pose stability or MediaPipe for a simple stack. For bigger jobs, multi-GPU support with FSDP and xDiT helps spread the work across cards.
Installation & Setup (Getting Started)
Below are the exact steps and commands shared by the authors. Follow them as-is.
Quickstart
Model Preparation
Installation
Install dependencies:
# Ensure torch >= 2.4.0
pip install -r requirements.txt
DreamID-V-Wan-1.3B-Faster
Please ensure you have downloaded dreamidv_faster.pth and the DWPose estimation models are placed in the correct directory.
DreamID-V/
└── pose/
 └── models/
 ├── dw-ll_ucoco_384.onnx
 └── yolox_l.onnx
- Single-GPU inference
python generate_dreamidv_faster.py \
 --size 832*480 \
 --ckpt_dir wan2.1-1.3B path \
 --dreamidv_ckpt dreamidv_faster.pth path \
 --sample_steps 16 \
 --base_seed 42
- Multi-GPU inference using FSDP + xDiT USP
pip install "xfuser>=0.4.1"
torchrun --nproc_per_node=2 generate_dreamidv_faster.py \
 --size 832*480 \
 --ckpt_dir wan2.1-1.3B path \
 --dreamidv_ckpt dreamidv_faster.pth path \
 --sample_steps 16 \
 --dit_fsdp \
 --t5_fsdp \
 --ulysses_size 2 \
 --ring_size 1 \
 --base_seed 42
DreamID-V-Wan-1.3B-DWPose
Please ensure the pose estimation models are placed in the correct directory as follows:
DreamID-V/
└── pose/
 └── models/
 ├── dw-ll_ucoco_384.onnx
 └── yolox_l.onnx
- Single-GPU inference
python generate_dreamidv_dwpose.py \
 --size 832*480 \
 --ckpt_dir wan2.1-1.3B path \
 --dreamidv_ckpt dreamidv.pth path \
 --sample_steps 20 \
 --base_seed 42
- Multi-GPU inference using FSDP + xDiT USP
pip install "xfuser>=0.4.1"
torchrun --nproc_per_node=2 generate_dreamidv_dwpose.py \
 --size 832*480 \
 --ckpt_dir wan2.1-1.3B path \
 --dreamidv_ckpt dreamidv.pth path \
 --sample_steps 20 \
 --dit_fsdp \
 --t5_fsdp \
 --ulysses_size 2 \
 --ring_size 1 \
 --base_seed 42
DreamID-V-Wan-1.3B-MediaPipe
- Single-GPU inference
python generate_dreamidv.py \
 --size 832*480 \
 --ckpt_dir wan2.1-1.3B path \
 --dreamidv_ckpt dreamidv.pth path \
 --sample_steps 20 \
 --base_seed 42
- Multi-GPU inference using FSDP + xDiT USP
pip install "xfuser>=0.4.1"
torchrun --nproc_per_node=2 generate_dreamidv.py \
 --size 832*480 \
 --ckpt_dir wan2.1-1.3B path \
 --dreamidv_ckpt dreamidv.pth path \
 --sample_steps 20 \
 --dit_fsdp \
 --t5_fsdp \
 --ulysses_size 2 \
 --ring_size 1 \
 --base_seed 42
Tips for Best Results
- Face reference: use a cropped face at 512x512. Avoid full-body shots for the source face.
- Steps and speed: for simple scenes, try 20 sampling steps to cut down run time. Some internal builds hit strong quality in under 8 steps in CapCut, as the authors note.
- Output size: aim for 1280x720 when you want the best look.
- Pose stability: the DWPose release (1.3B-DWPose) boosts pose extraction stability.
Curious about big model demos for video? See our short explainer: Goku-style video generation notes.
FAQ
Do I need a perfect face photo?
A clean, cropped face at 512x512 works best. Try to avoid heavy makeup, strong blur, or side profiles as your only source image. A straight face view usually gives a better match.
Can I run this on a single GPU?
Yes, the authors share single-GPU commands for all three variants. The “Faster” build is tuned for lower VRAM and can help if your card is tight on memory.
What video size should I pick?
1280x720 is suggested for top quality. You can start smaller for testing, then switch to 1280x720 for your final output.
Which pose method should I choose?
Use DWPose if you want stronger pose stability. Pick MediaPipe if you prefer a simpler stack for quick tests.
How many steps should I try first?
Start at 20 for most scenes to save time. If you have more room, you can raise steps a bit to see if it helps your clip look crisper.
Can I speed it up on more GPUs?
Yes. Use the multi-GPU commands with FSDP and xDiT. This can help with faster runs or bigger batch sizes.
Image source: Next-Gen Face Swapping: Bridging the Image-to-Video Gap with DreamID-V