Visual Design: The Power of DreamPoster for AI-Driven Poster Creation

What is The Power of DreamPoster for AI-Driven Poster Creation
DreamPoster is a research project that turns your image and short text into a polished poster. It focuses on layout, fonts, and clear placement of elements, so your final design looks neat and ready to share.
It learns from many high-quality posters and follows your prompt. You give it an image and a few words, and it builds a strong poster around them.
The Power of DreamPoster for AI-Driven Poster Creation Overview
DreamPoster blends text and image input to craft well-structured posters. It can add, edit, or remove text, and it can change style while keeping the subject in focus.
Use cases include ads, event flyers, product posters, and social posts. The team also shows a full data pipeline and a multi-stage training method to reach pro-level results.
| Item | Detail |
|---|---|
| Type | AI poster generator (text + image input) |
| Purpose | Create clean, high-quality posters from your image and prompt |
| Inputs | A user image + short text prompt |
| Outputs | A finished poster with layout, fonts, and style |
| Main Features | Text add/edit/delete, style change, subject focus, layout control |
| Model Style | Multi-modal model that mixes text tokens, image tokens, and noise tokens |
| Training | Three stages: single-task pretraining, multi-task mixed training, fine-grained aesthetic tuning |
| Data | Large poster dataset, filtered and labeled with a custom pipeline |
| Best For | Ads, events, brand stories, product launches, social media graphics |
| Availability | Public project page with results and method details |
| Website | https://dreamposter.github.io/ |
Some examples on the site use Seedream 3.0 as the source of input images. If you want a quick intro to smart creative tools, check our short note on AI platforms like Goku.
The Power of DreamPoster for AI-Driven Poster Creation Key Features
-
Image + text to poster: You give one image and a short prompt; it returns a ready-to-share poster.
-
Text controls: Add, change, or remove words while keeping the design tidy.
-
Style control: Switch poster styles while keeping the main subject clear.
-
Strong layout: The model learns spacing, alignment, and font choices from real posters.
-
Subject protection: The key object in your image stays clear and well-placed.
-
Prompt following: It aims to follow user text closely, based on tests shown on the site.
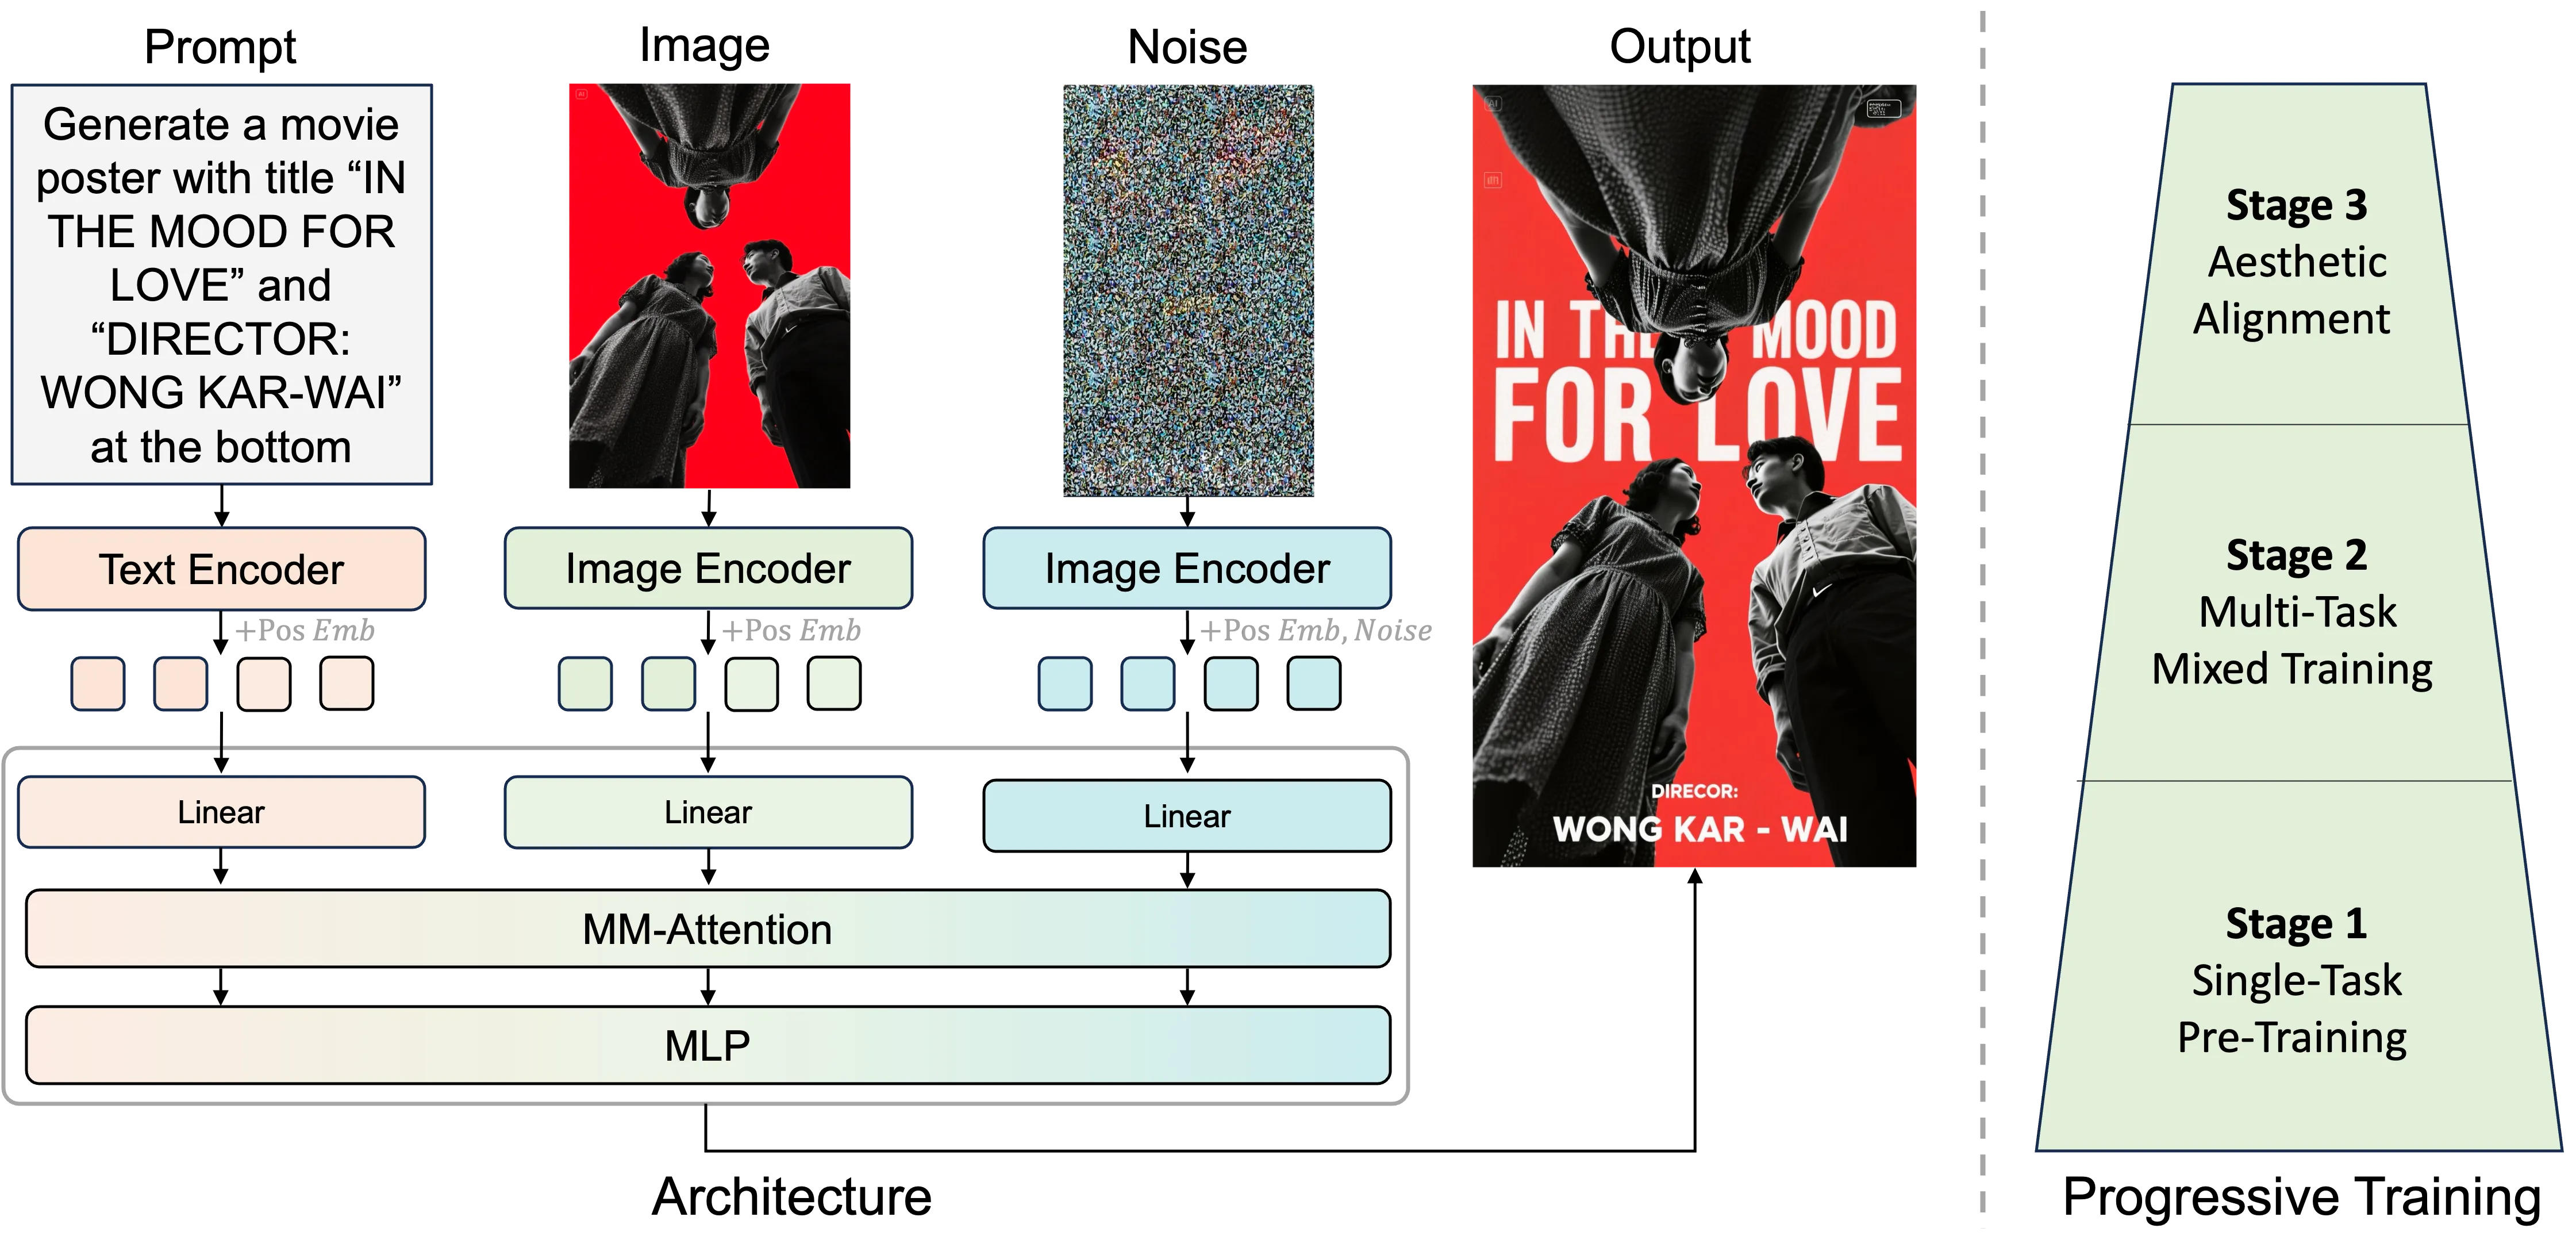
How DreamPoster Works (Simple Walkthrough)
DreamPoster mixes three things at once: your text tokens, your image tokens, and some noise tokens. These go into one sequence so the model can read them together.
Training happens in three steps. First, it learns only to add text on images. Next, it learns many tasks like text change, deletion, and style change.
Last, it fine-tunes on a small top-quality set to polish spacing and layout. This last step brings strong control of tiny design details.
Data Pipeline: Where the Quality Comes From
The team builds a large poster dataset and cleans it with a custom pipeline. This includes filtering low-quality items and adding labels that help with layout and style learning.
These steps help the model learn clear structure, font choice, and spacing from real designs. Better data means better layout and stronger results in the final posters.

For more background on creative AI for motion and design, see this quick read on dance-focused tools that push new forms of media.
The Technology Behind It
- Token mix: The model reads text tokens, image tokens, and noise tokens together with position markers. This helps it know where each part belongs.
- DiT fine-tuning: The team fine-tunes select layers in a Diffusion Transformer (DiT) to guide layout and style.
- Step-by-step training: Single-task first, then mixed tasks, then a small, high-quality set to nail down taste and spacing.
This setup helps the model keep the subject clear while arranging titles, taglines, and extra lines. It aims for posters that look tidy and on-brand.
Installation & Setup (Project Page Template)
This project’s public page is built with an academic project page template. If you want to make a similar page for your own work, here is how the template says to start:
- To start using the template click on Use this Template.
- The template uses html for controlling the content and css for controlling the style. To edit the websites contents edit the index.html file. It contains different HTML "building blocks", use whichever ones you need and comment out the rest.
- IMPORTANT! Make sure to replace the favicon.ico under static/images/ with one of your own, otherwise your favicon is going to be a dreambooth image of me.
What’s new in the template includes better mobile support, improved SEO, performance upgrades, and handy blocks like a video carousel, PDF poster viewer, and more. It also has tips such as compressing images and using YouTube for large videos.
The Three Training Stages, Explained
- Stage 1 — Single-task pretraining: Only learns to add text on images, so it picks up the basics of connecting words to pictures.
- Stage 2 — Multi-task mixed training: Learns text change, deletion, and style change, so it can handle many poster needs.
- Stage 3 — Fine-grained tuning: Trains on a small, high-quality set to improve spacing, layout ties, and tiny design choices.
This path helps the model grow from simple tasks to fine taste. It improves prompt following and keeps the main subject clean and strong.
The Power of DreamPoster for AI-Driven Poster Creation Use Cases
-
Event flyers: Input a photo from the venue or speaker, then add the date, time, and a short title.
-
Product posters: Use a product shot and write a tagline; keep the logo safe and clear.
-
Brand stories: Share a mood image and a short message with strict spacing.
-
App or game promos: Add a character image and a punchy line for stores or banners.
-
Social posts: Turn a single image and a line of copy into a shareable graphic quickly.
-
Education: Create class or club posters that look tidy and balanced.
If you build interfaces and want to see how teams use AI for design tasks, here’s a quick note on UI tools like Tars that help structure layouts and flows.
Performance & Showcases
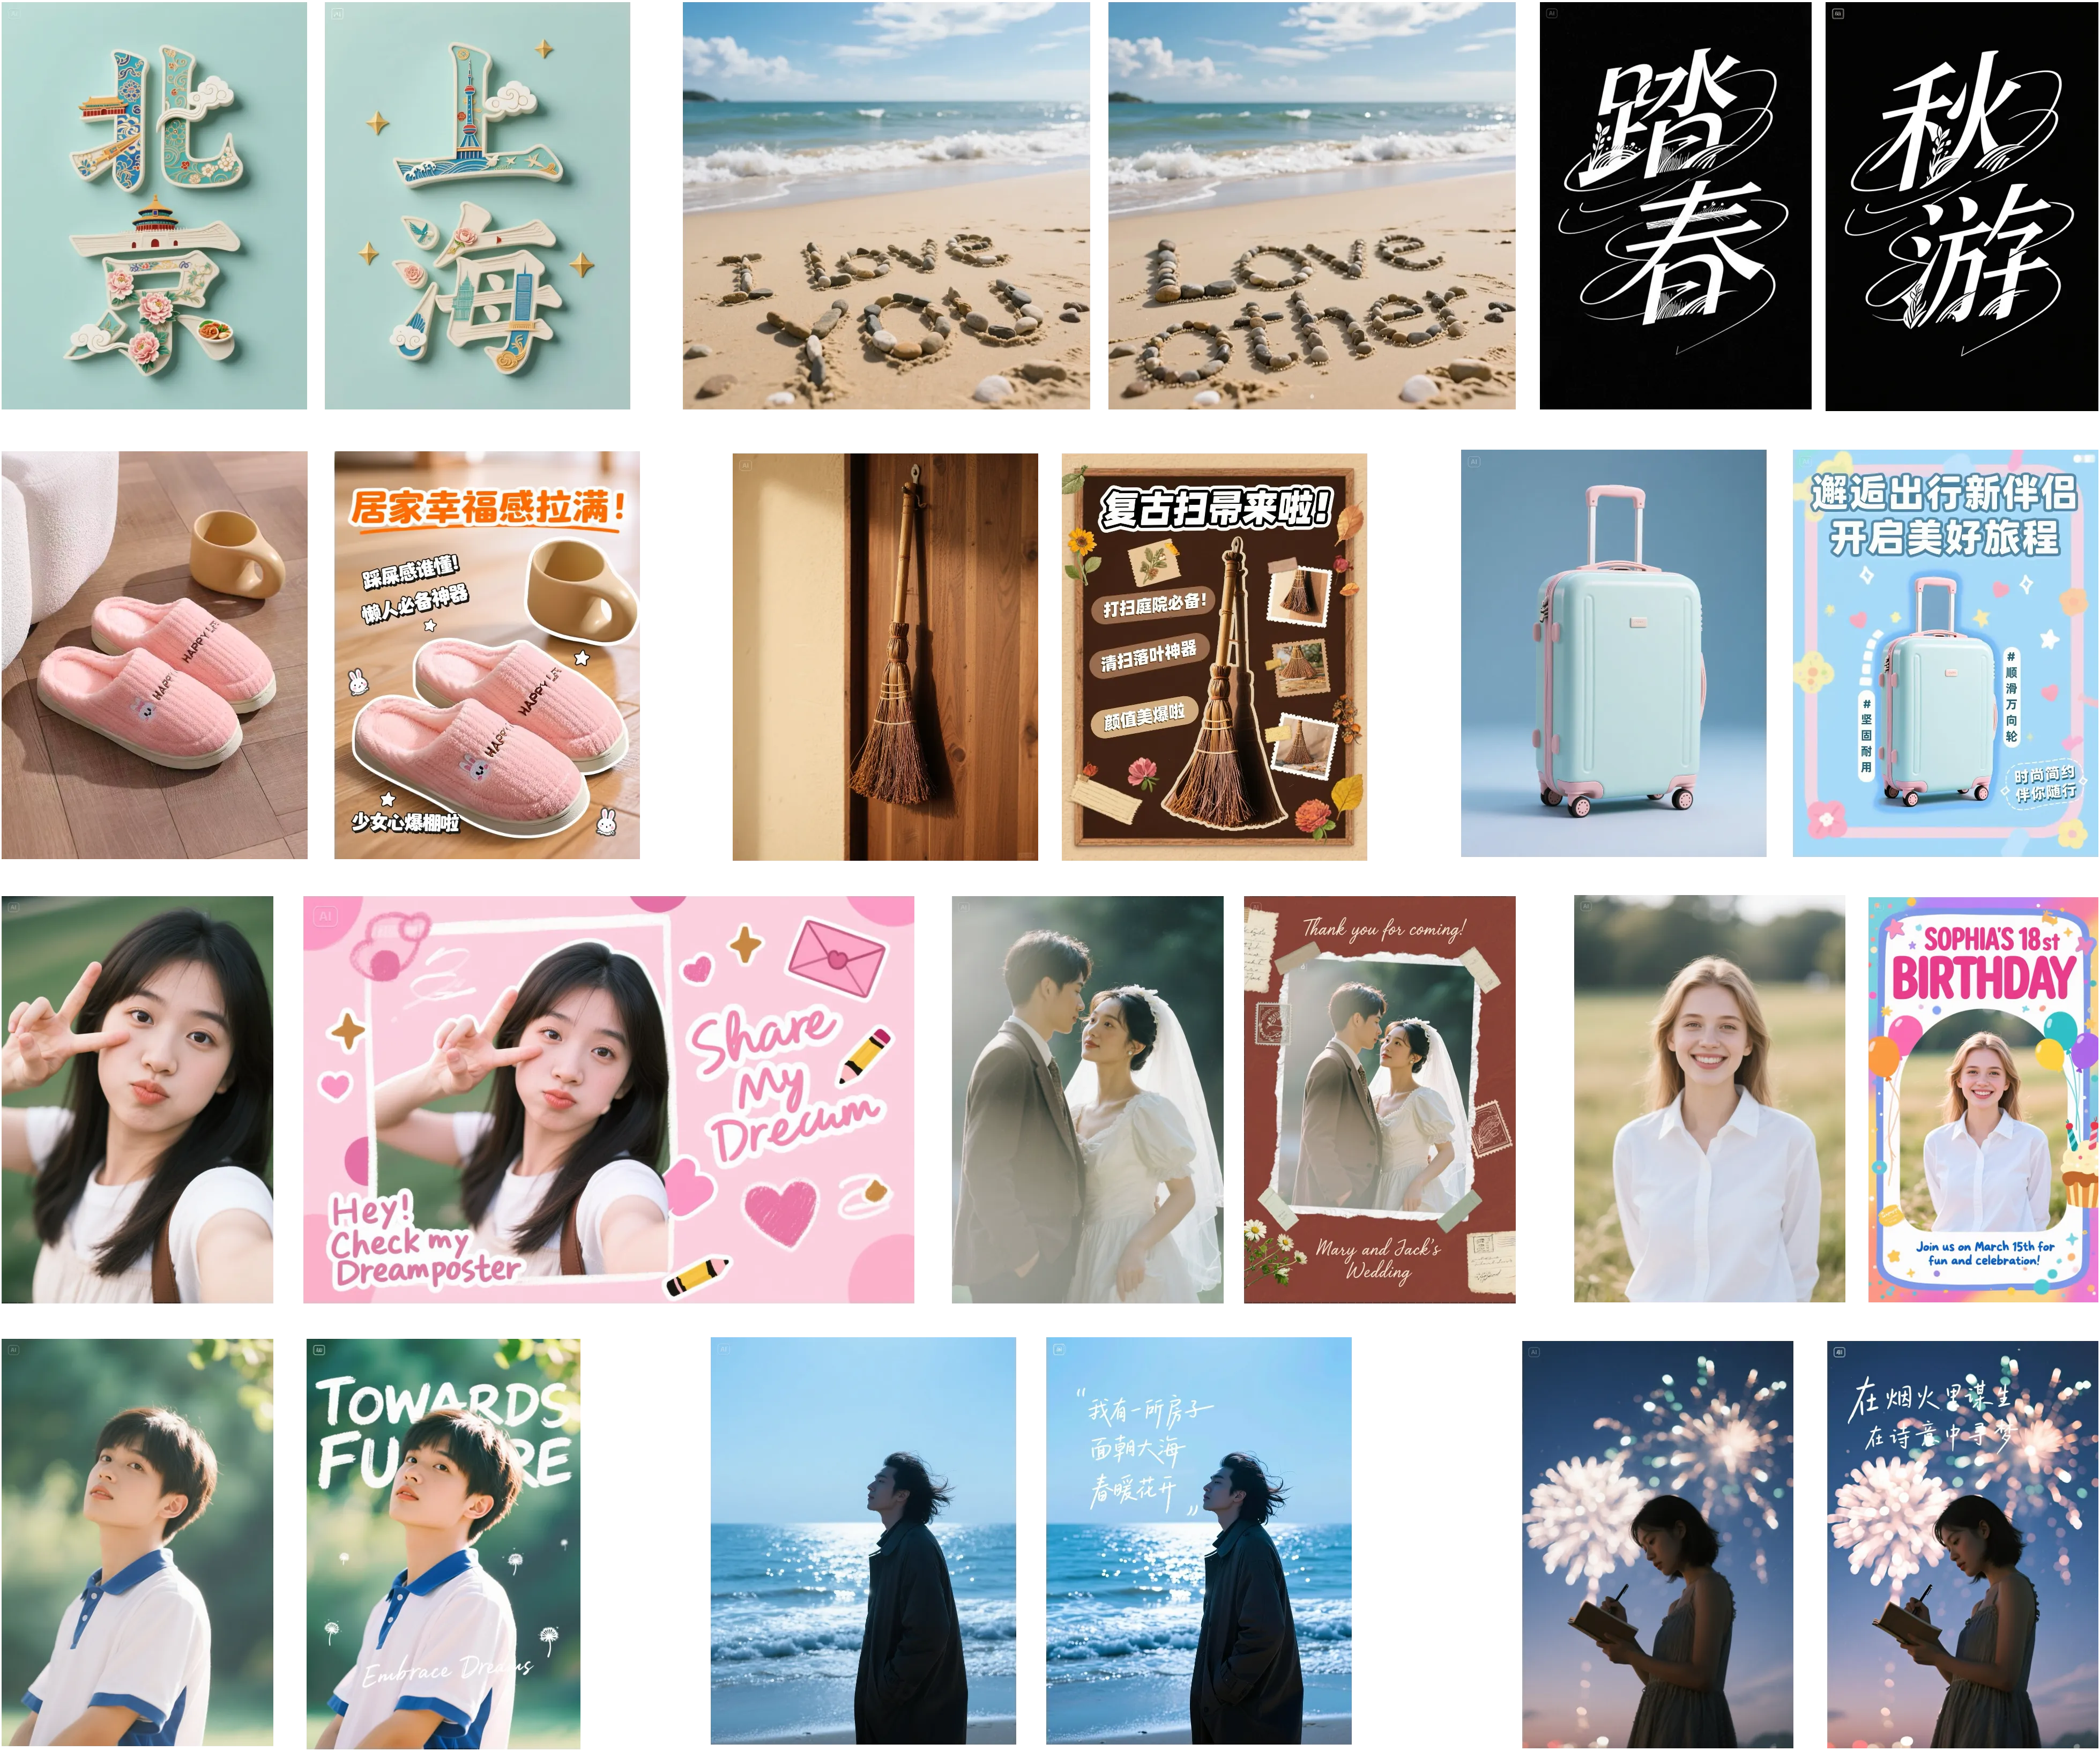
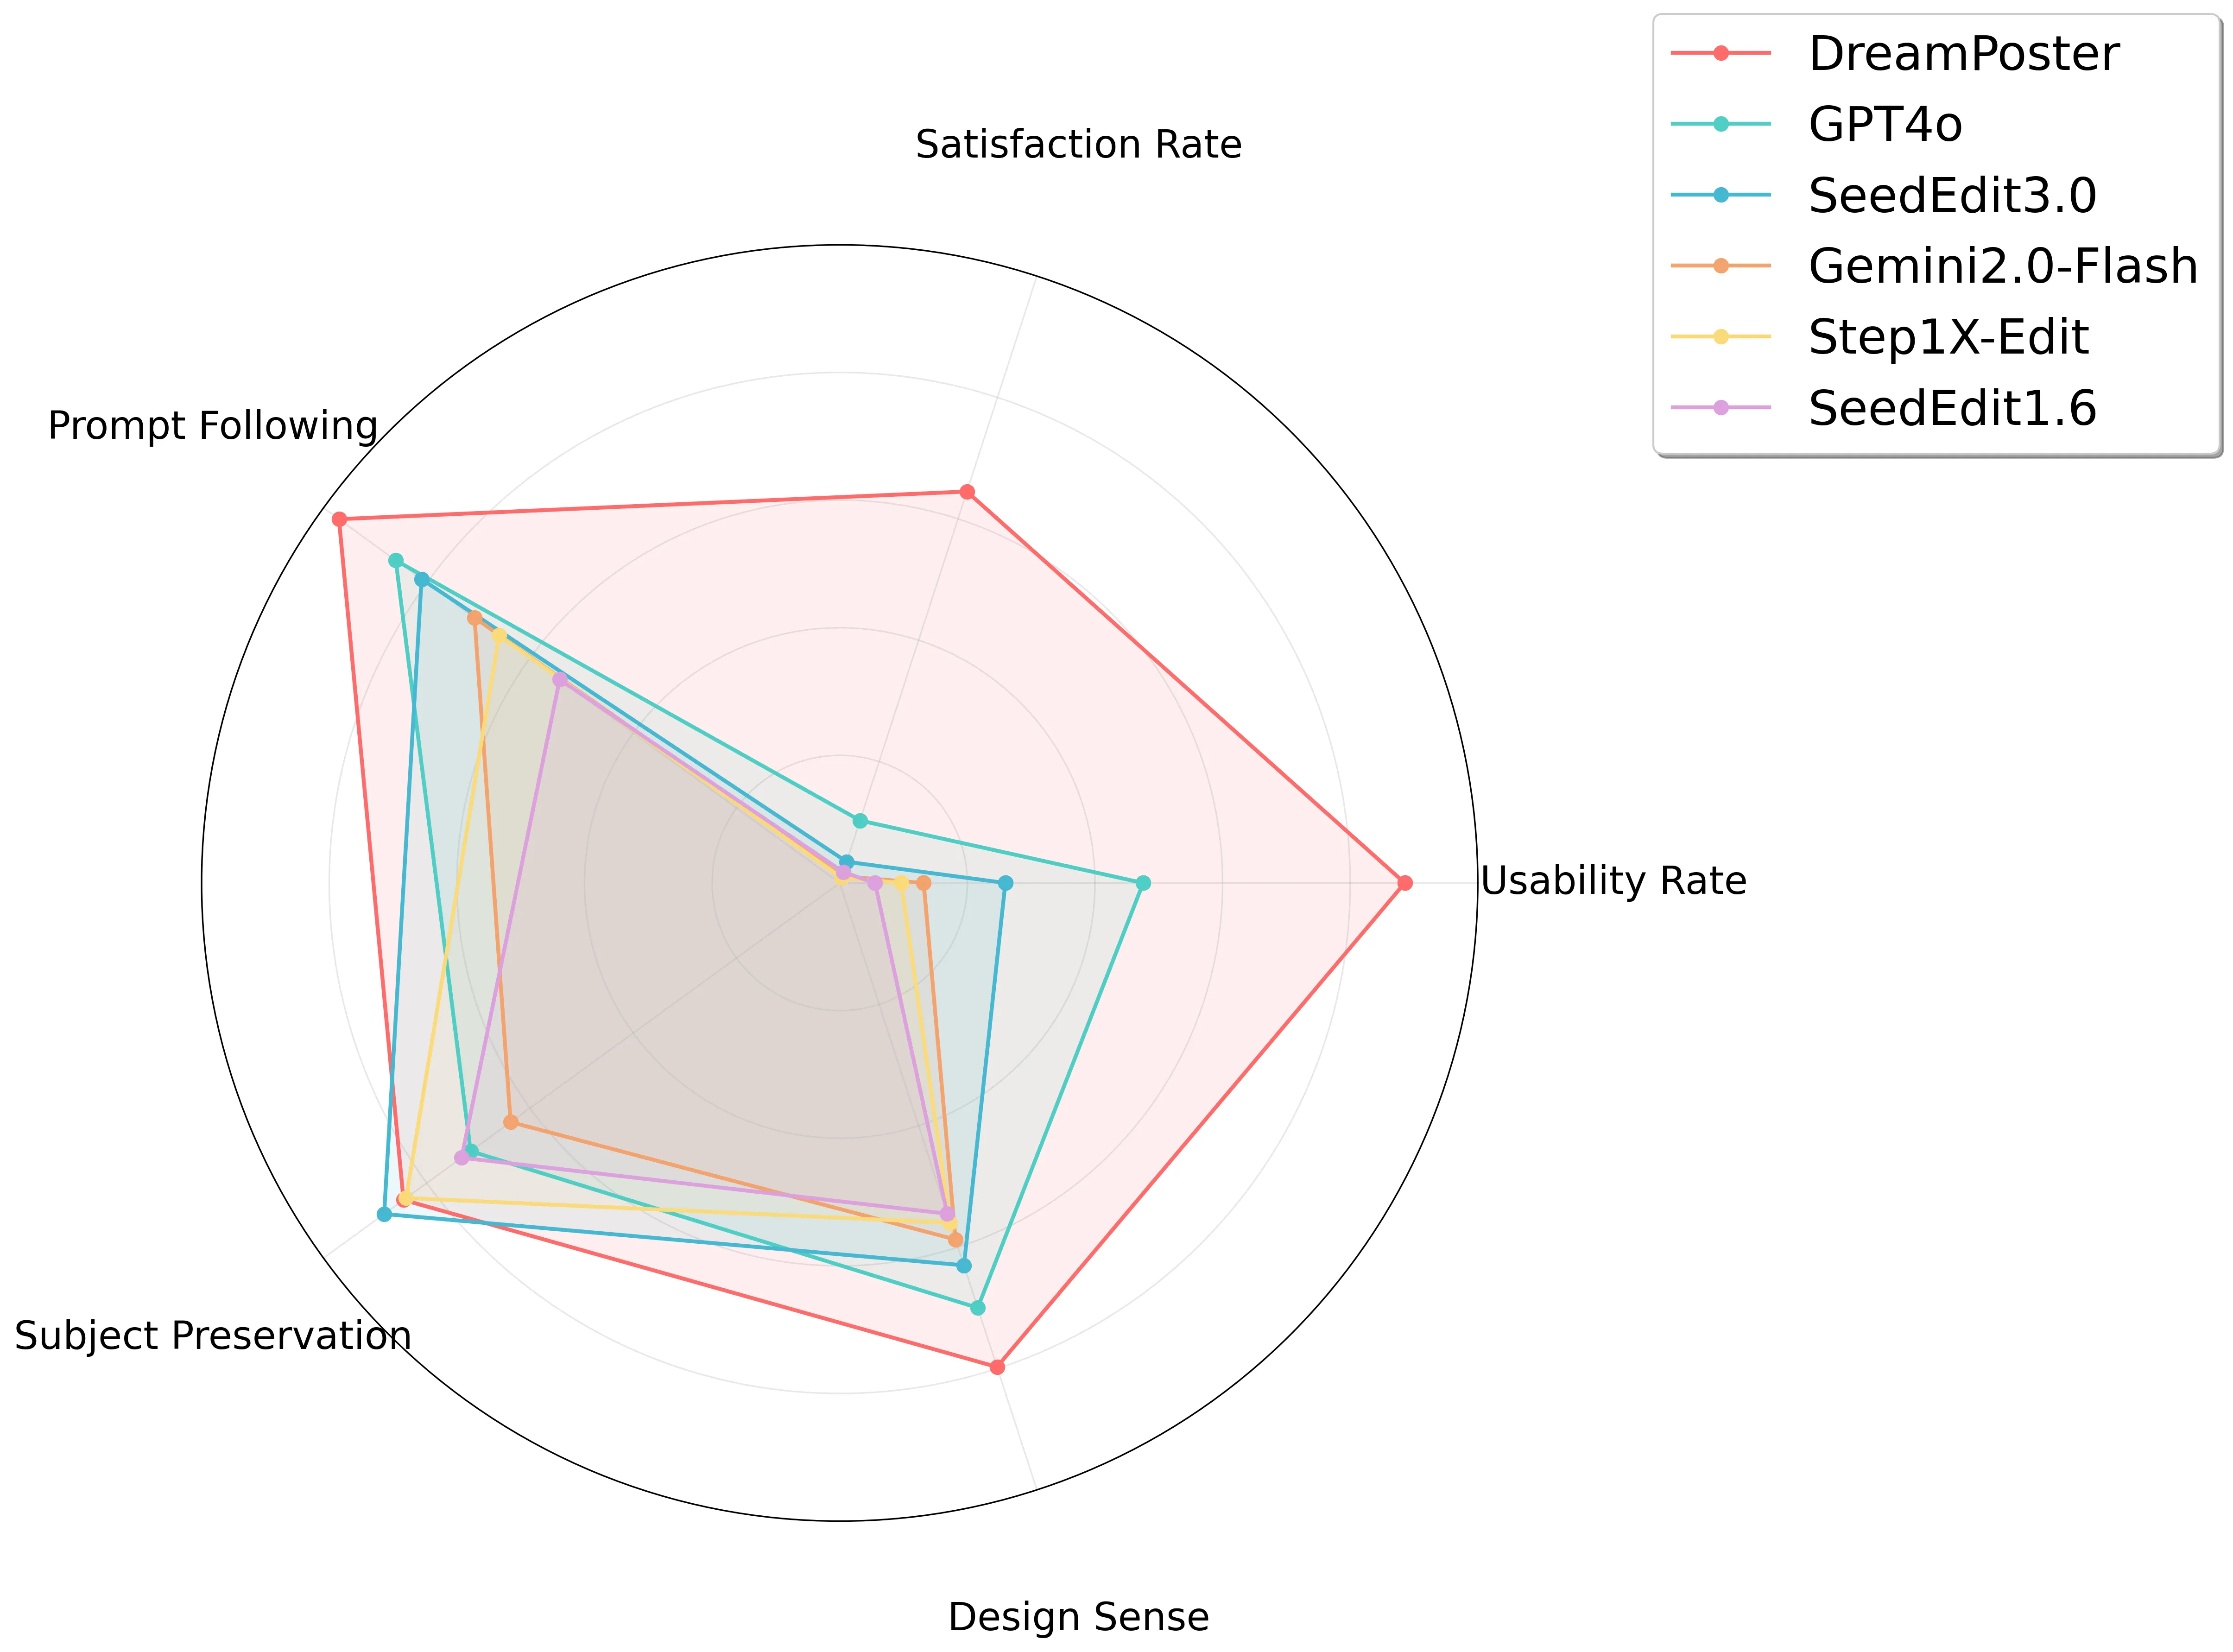
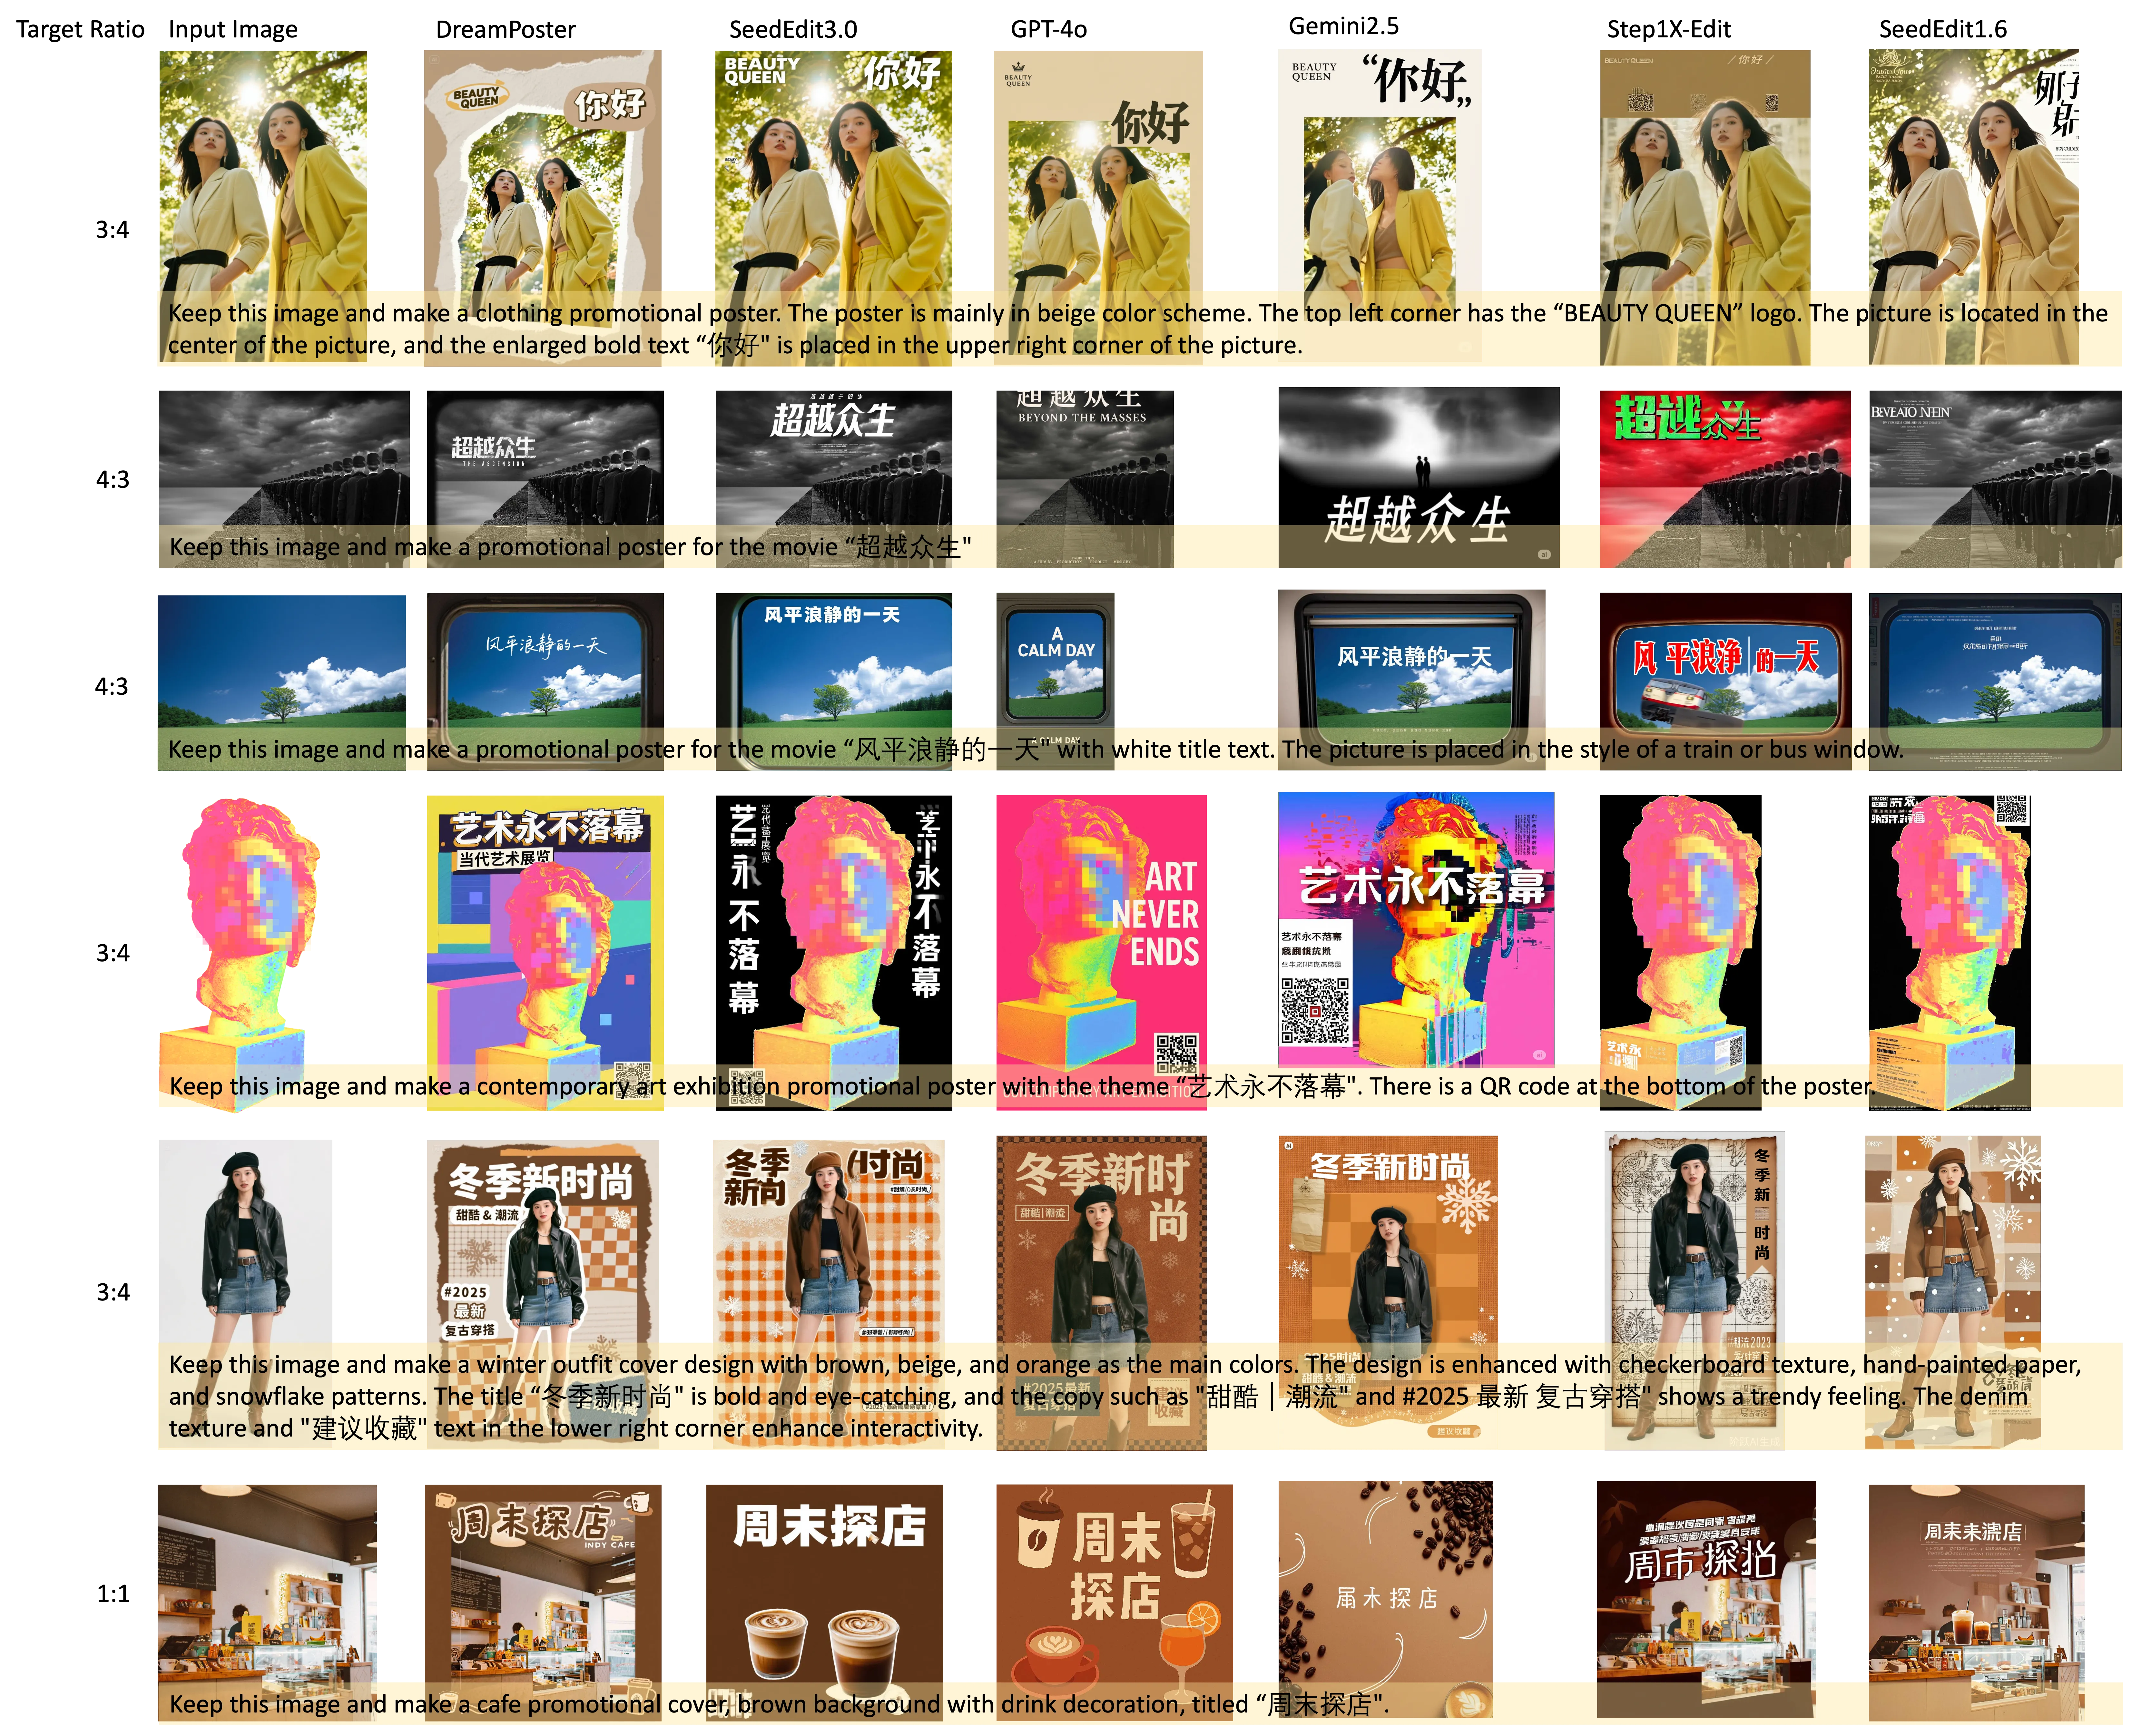
The team presents side-by-side tests with other strong baselines. They score prompt following, subject quality, and layout taste in detailed user studies.
The page also shares hard numbers and examples to back the method. You can scan both charts and gallery views to judge outcomes for your needs.
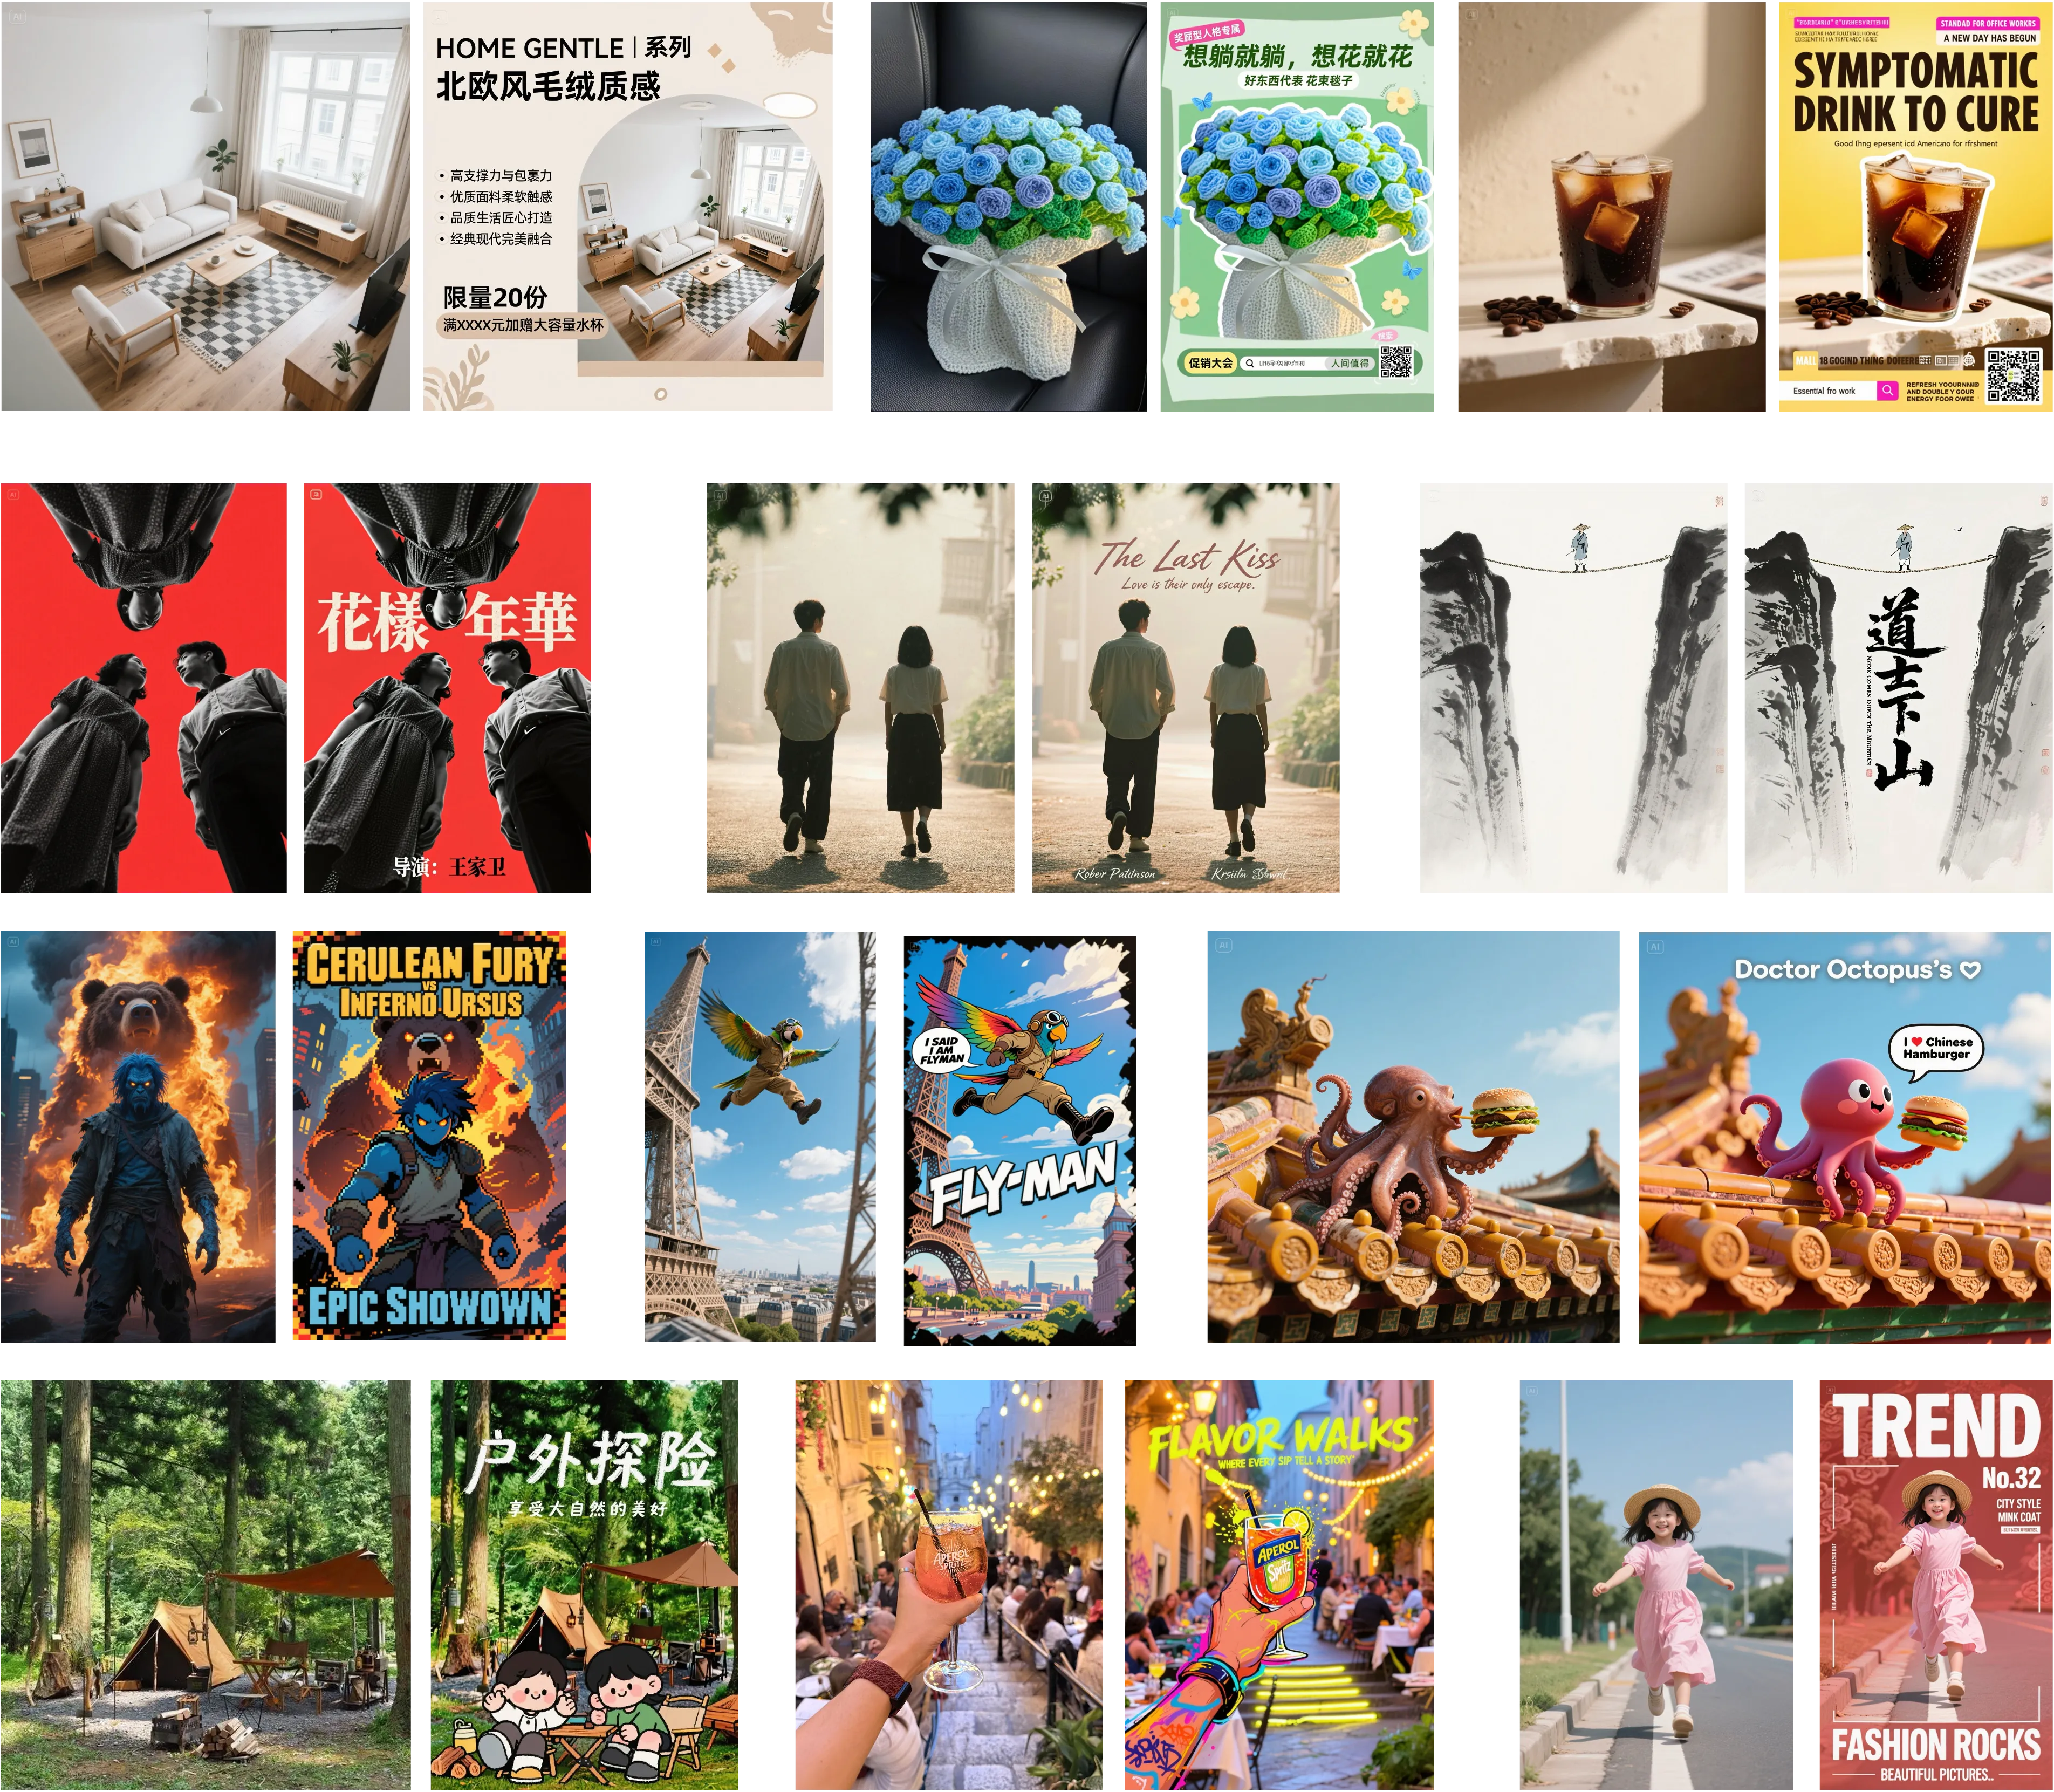
These examples show clear text placement and solid subject focus across many styles. You can see how it handles titles, taglines, and secondary text without crowding the image.
Step-by-Step: Get Great Results
-
Pick a clear subject image. Make sure the main object is easy to see with room for text.
-
Write a short, direct prompt. Include title, short subtitle, and any key words like “minimal”, “bold”, or “retro”.
-
Review the first draft. If text feels tight, ask for more spacing or smaller fonts in your next prompt.
-
Try a style change. Ask for “event poster style” or “brand ad style” to shift tone.
-
Keep edits short. Change one or two parts per round so the model knows what to fix.
Tips for Prompt Writing
-
Keep lines short: long titles often crowd the subject.
-
Name hierarchy: say “Big Title: …, Small Subtitle: …, Footer: …”.
-
Mention mood or style: “clean”, “bold”, “retro”, “modern”.
-
Ask for space: “leave headroom above subject”, “keep left margin for title”.
-
Protect the subject: “do not cover the face” or “keep product center clear”.
FAQ
What inputs does DreamPoster need?
You provide an image and a short text prompt. The model then designs a poster around them. It aims to place text wisely and keep the main subject clear.
Does it support style changes?
Yes, it can switch styles while keeping the subject and message. You can ask for “minimal”, “retro”, or “bold”, and tune further with short edits. Try small changes first, then refine.
How does it keep the subject clean?
It learns from a curated poster dataset and follows a training plan that focuses on layout and spacing. This helps it avoid covering key parts like faces or logos. Clear prompts also help.
Can it edit or remove text?
Yes, it can add, edit, or remove text as a task. This is part of its mixed training so it can handle many poster needs. Keep requests short and direct.
Are the examples on the site from real inputs?
Yes, the page shows a mix of tests and results. Some inputs are generated by Seedream 3.0, then used as the base images for posters.
Is there a public tool I can try today?
The project page shows results and method details. A public tool may appear later. Watch the site for updates.
What if my prompt is long?
Shorten it to title, subtitle, and one short line. Long prompts can crowd the layout. Keep each line focused and clear.
How do I keep fonts readable?
Ask for “high contrast text” or “clear title at top-left”. Also give the model room around the subject for text blocks. If needed, ask for smaller font or more spacing.
Image source: https://dreamposter.github.io/